Waterproofing your leaking shower is easier than you think! We will guide you through the DIY process, and in just one day, your tiled shower will be like new. You just decide, if you want a shiny or satin look and maybe a non-slippery surface.

WHAT YOU’LL NEED:
The Clear Waterproofing Membrane Shower Tray Kit and some basic tools. If you’re a DIYer, you’ll probably already have most of these tools.
- For your protection, you should wear
- Goggles
- Gloves
- Protective Waterproof Suit
- Gum Boots
- You will need the following tools:
- Scrubbing Brush
- Caulking Gun
- 75mm plastic scraper
- Mixing paddle
- 4mm nap hair roller
- Bucket
- Clear Waterproofing Membrane Shower Kit
- Chlorine
- If you want to repair the grout of your shower, you’ll also need
- Grout
- Grout Float
- Mixing trowel
1. Surface Cleaning and Silicone Removal
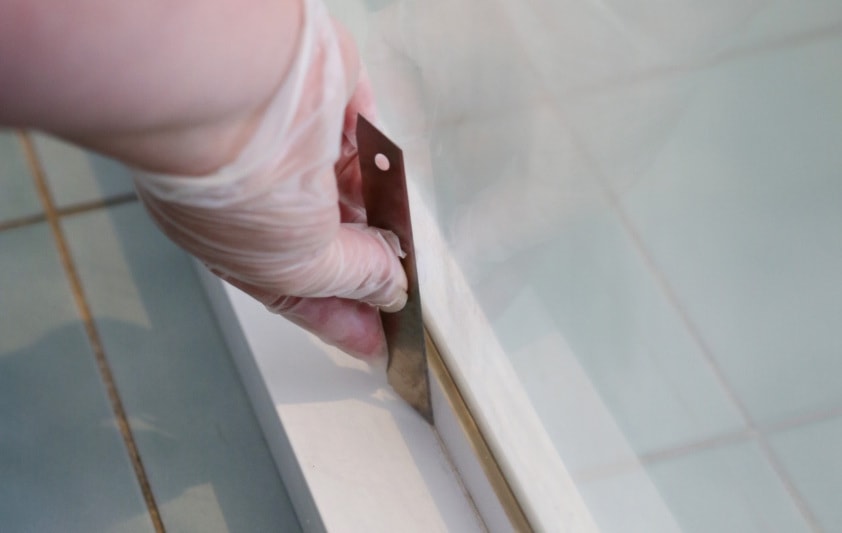
With a knife, start removing all old silicone and then scrape away any excess.
Once done, wet the surface of the shower so that the cleaning agent only cleans the surface and doesn’t soak into the tiles or grout.
Clean the whole surface of the shower to remove any dirt, grease, mould, fungi, and dust. Make sure there’s no mould left on the surface. We suggest using a mixture of chlorine to kill mould spores. Chlorine can be very strong, so dilute with water to your comfort level and make sure to use your Personal Protective Equipment. You should always wear gloves, goggles, and masks when using chlorine.
After cleaning, rinse the surfaces thoroughly and repeatedly to remove any leftover cleaning solution. To avoid dripping on the membrane, cover the shower rose with a plastic bag or glove after cleaning.
2. Shower Preparation
Firstly, check to see if there are any loose tiles or grout, this can affect how well the Clear Waterproofing Membrane (CWM) sticks to the surface. If you find any loose tiles, you can stick them back on with the Joint Adhesive included in our shower try kit or any other Joint Adhesive. This adhesive doesn’t need to cure completely before you can apply the CWM.
If any grout is missing, replace it with a close match and let it cure for the time listed on the packaging. If you don’t have time to wait for it to cure, use the recommended caulking instead.
☞ If the sub straight (the surface under the tiles) feels soft like a sponge when you remove a tile, you might have water damage. You might need to get help from a specialist to fix it because it could have damaged the building materials.
Use a small fan heater, a heat light or lamp to dry the shower completely. This could take anywhere from 30 minutes to a day, depending on how much water is on the shower floor. Sometimes it’s easier to leave it overnight, so you’re not waiting around to find out if your shower is dry. Just be sure to set up the leads properly to avoid fire hazards.
Extra Step for Showers with Stone Tiles only: Sealing
If you have stone tiles, you’ll need to seal them using CWM Penetrating Sealer. To make the sealer, you’ll need to dilute the membrane.
Mix equal parts of Part 1 and water, and then add 10% of Part 2. This will make the membrane thin like water. You’ll need about 100 ml of each per coat for a standard shower of 900 × 900 mm.
If you need assistance, we offer full helpdesk support, just call 02-8012-7216 or email helpdesk@remedialmembranes.com.au and reach out any time before, during or after your installation with your questions.
If your tiles are very porous, you might need two coats of sealer. Even though the membrane is only going to be applied in the shower floor area, all stone tiles in the shower recess need to be sealed to prevent water transfer.
After you apply the first coat, wait until the surface goes back to its original colour before applying the next coat of sealer (if needed).
3. Leaking Shower Base Repair: Caulking
Now it is time to look for cracks where the water may be leaking from, such as in the junctions between the wall and floor or any cracks on the floor due to expansion over time.
Apply the Joint Adhesive on all the junctions between the wall and floor, and between walls up to above the shower rose. Remove the waste grate and seal the bottom of the waste grate to the puddle flange. Also, apply the caulking from the tile to the waste grate and scrape it back to make sure it’s not raised.
Fill any movement cracks with the Joint Adhesive, creating an on-top expansion joint for future movement.
You can choose from a range of colours to suit your application. If you have white tiles, a white caulk is recommended, although clear is the easiest to use. Remember that the Joint Adhesive or caulk does not need to cure before applying the CWM.
4. First Coat to Reseal your Shower
Depending on the finish you have chosen, start mixing the ingredients for the first coat.
✎ Once the membrane is mixed, it has a life of approximately 4 hours, so only mix what you will use immediately.
To get a glossy finish, mix both parts 1 and 2 for both coats. Mix part 2 in a volume of 10-20% with part 1, and the more part 2 you mix in, the thicker the membrane will be. Shower Tray Kits already have 20% of part 2 pre-measured for part 1.
For a satin or matte finish, only add part 2 to the first coat and measure how much part 1 you need.
The second coat should include part 1, Matting Paste, and Slip Resistant Aggregate.
Mix CWM2 liquid slowly into CWM1 liquid while stirring to ensure proper mixing. Allow the mix to stand for 5 mins before use.
Desired Finish
- Gloss
- 1st Coat – Part 1 + Part 2 (10-20%)
- 2nd Coat – Part 1 + Part 2 (10-20%) + Aggregate
- Satin / Matte
- 1st Coat – Part 1 + Part 2 (10-20%)
- 2nd Coat – Part 1 + Paste 2.5 Satin or 5% Matte+ Aggregate; NO Part 2
In cooler climates, part 1 will be thickened, so add 50ml of part 2. If the membrane is too thin, add the rest of part 2 to part 1. The consistency should be like thick paint/membrane. Adding part 2 will increase the thickness. You can add up to 5% water if the membrane becomes too thick.
Shower Tray Kits are measured to achieve a desired thickness of 500 microns (0.5 mm) for a standard shower.
Apply the CWM with a 4 mm nap hair roller in all junctions between the wall and the floor. Start from a grout joint and work down and in from the floor perimeter, covering at least 100mm.
Then use the roller to apply the fluid to the complete shower floor, moving in one direction to ensure complete coverage without leaving puddles.
If you have runs or puddles in the corners, wipe over to remove them.
Now take a break and let the first coat dry or you can use mechanical drying to speed up the curing time of the first coat.
Once the first coat is touch dry, fully transparent and has no visible whitening, especially in the junctions between wall and floor, you are ready to apply the second coat.
5. Second Coat of Paint on Waterproof Membrane
Now it’s time to mix the paint-on waterproofing membrane for the second coat. Depending on what you mix into this coat, your shower will result in a glossy or satin finish, PLUS you can even make it less slippery, if you want. All in one go!
Take a look at the table above to find the right mix for your desired outcome.
If you want a shiny finish, mix part 1 and part 2 with aggregate.
If you want a less shiny or flat finish, mix matting or satin paste with the aggregate.
Keep stirring the mixture, so the aggregate doesn’t settle.
Use a nap roller to apply the second coat of CWM to all the junctions between the wall and the floor. Apply the coat as high as the previous one and 100mm away from the floor perimeter.
If your shower is big, and you cannot reach in from the door, then do the two perimeter coats first. After that, apply the infill coats. This will make it easier and less likely to damage the membrane.
If you have glossy walls and a less shiny floor, then mix enough membrane, so you can use the first mixture for the walls and the second mixture for the floor only (without part 2).
Leave the surface to dry overnight with an open window and good ventilation. Your shower can be used after 24hrs although we request that the shower is wiped dry after use until full cure. The paint-on waterproofing membrane will cure completely in seven (7) days.
Summary
After you finished all five steps, your leaking shower is now waterproof and looks like new!
Frequently Asked Questions
When can the shower be used after application?
Your shower can be used next day, but full cure occurs between three (3) to seven (7) days so if using in this time please wipe dry after use.
What can I use to clean the shower after application?
White vinegar. If you have any stains use Methylated Spirits or Denatured Alcohol with a Magic Eraser from your local hardware.
What will the shower look like after the CWM application is finished?
After application, the membrane is clear but not invisible. You generally won’t notice much of a difference when it is applied on gloss tiles; however, if installed on matt tiles or stone, you will notice an enriched colour and a glossy finish similar to what the tiles look like when wet.
What is the best way to avoid mould?
Mould is usually unwanted in our homes. As such, the membrane has anti-mould properties similar to silicone, but the best way to avoid mould in your shower is to dry it after use and encourage natural ventilation and light.
I used the shower the day after application and it turned a whitish colour. What should I do?
While the membrane is going through its curing process, it will react differently when it comes in contact with water. If used within the curing time expect to have a whitish reaction, but once dry, it will return to being clear and transparent.
